
Schema markup helps search engines understand what your page is about, what key information it contains, and how different entities on the page relate to each other. It’s often talked about because of rich results, but that is not its only use and also not a guarantee.
Adding schema to your website can help search engines identify products, services, locations, articles, reviews, FAQs, organisations, and other important details more clearly. This can support rich results, but it can also improve how search engines and AI-led search systems, such as ChatGPT and Large Language Models (LLMs), interpret your content. This is important because it allows search engines and algorithms to deliver precise information and answers rather than using keywords to guess the search intent of your pages and content.
If you’re looking for the strategy behind structured data, we recommend starting with our guide to “Structured Data & Rich Results”, or if you’re still getting to grips with the basics, read “What Is Schema in SEO?” first.
This guide will focus on how to add schema to your website, the different implementation methods available, when dynamic schema makes sense, and how to test that everything has been added correctly.
Jump to:
- The main ways to add schema to your website
- How to manually add schema using JSON-LD
- How to add schema using a plugin
- When dynamic schema makes sense
- Examples of schema in use
- How to test schema markup
- Common schema mistakes to avoid

The Main Ways to Add Schema to Your Website
There are several ways to add schema to a website, but the right option depends on your CMS, the type of schema you need, how many pages you are working with, and how comfortable you are editing website code.
The main methods are:
- Manually adding JSON-LD schema to individual pages
- Dynamically generating schema from templates or data sources
- Using a schema plugin or SEO plugin
- Adding custom schema through your theme, CMS, tag manager or developer setup
Most websites use a mix of these methods. For example, a WordPress site might use an SEO plugin for basic Article schema, but custom JSON-LD for more specific LocalBusiness or Service schema.
Manual Schema
Manual schema means creating the structured data yourself and adding it to the relevant page. This is usually done using JSON-LD, which is the preferred format for most modern schema implementation. JSON-LD sits inside a script tag and is usually placed in the page head or body.
Manual schema can work well when you only need to add schema to a small number of important pages, such as your homepage or a key service page.
With manual schema, you can decide exactly what to include; however, it can be slower to manage, especially if you need to update schema across lots of pages.
Dynamic Schema
Dynamic schema is generated automatically using page templates, CMS fields, product data, location data, or other structured sources.
Instead of writing a different schema for every page, you create a template that pulls in the right information for each page. This type of schema is best when you have multiple pages that will need the same information.
For example:
- A product page template can pull in the product name, image, price, and stock status.
- A location page template can pull in the town, address, phone number, and opening hours.
- A blog template can pull in the article headline, author, date, and featured image.
Dynamic schema is usually the better option when you have lots of similar pages that would benefit from schema markup.
Plugin-Based Schema
Plugins can be one of the easiest ways to add schema to your website, especially if your site is built on WordPress or Shopify.
SEO plugins such as Yoast, Rank Math, and Schema Pro can generate schema for common page types. This can include Article schema, Breadcrumb schema, Product schema, FAQ schema, and more, depending on the plugin and settings. Adding schema this way is best for common page types and those who are not confident adding schema themselves.
Plugins are typically easy to use, but they can be limited. For example, some plugins may add generic schema or markup that does not properly match your content. This will provide search engines with incorrect or conflicting information about what is on the page, resulting in inaccurate rankings and information, or you will miss out on the opportunity to show in Rich Results.
Custom Schema
Custom schema is usually the best option when you need more control than a plugin can offer. This might involve adding schema through your theme files, custom fields, Google Tag Manager, a CMS template, or developer-managed code.
Custom schema is useful when:
- Your pages use a specific layout or template
- You need more detailed schema than a plugin provides
- You want to connect entities more clearly
- You have multiple locations, products or services
- You need schema to match your content exactly
For larger SEO projects, custom schema is often the cleanest option because it can be planned around the site structure, not just added as an afterthought. It also stays consistent across templates, and will automatically update as the content changes, meaning it needs less maintenance.

How To Add Schema To Your Website Manually Using JSON-LD
If you want to add schema manually, the usual process is:
- Choose the right schema type for the page
- Create your JSON-LD markup
- Add the JSON-LD to the relevant page
- Test the page using structured data tools
- Monitor the page after it has been crawled
Before adding schema, make sure the information in your markup is also visible on the page. Schema should describe the content that users can already see. It shouldn’t be used to hide extra keywords, fake reviews, false pricing, or information that’s not present on the page.
Step 1: Choose the Right Schema Type
Start with the page itself. What is the main purpose of the page?
For example:
- Homepage: Organisation or LocalBusiness schema
- Product page: Product schema
- Blog post: Article or BlogPosting schema
- FAQ section: FAQPage schema
- Location page: LocalBusiness schema
- Service page: Service schema
If you’re unsure, keep it simple. It’s better to use one accurate schema type than several unrelated ones.
Step 2: Create Your JSON-LD Schema
You can write JSON-LD yourself, use a schema generator, or use a plugin as a starting point.
A basic JSON-LD script looks like this:
<script type=”application/ld+json”>
{
“@context”: “https://schema.org”,
“@type”: “Article”,
“headline”: “How To Add Schema To Your Website”,
“author”: {
“@type”: “Person”,
“name”: “Wildcat Digital”
}
}
</script>
This is a simplified example, but it shows the basic structure. The script tells search engines the schema vocabulary being used, the type of content being described, and the key properties connected to it.
What each section of the schema script means:
- <script type=”application/ld+json”>: This tells the browser and search engines that the code inside is JSON-LD structured data, not normal page content.
- “@context”: “https://schema.org“: This tells search engines that the structured data follows the Schema.org vocabulary.
- “@type”: “Article”: This tells search engines what type of content the page contains.
- “headline”: “How To Add Schema To Your Website”: The main title of the content.
- “author”: { “@type”: “Person”, “name”: “Wildcat Digital”: This tells search engines who wrote the article.
Step 3: Add the Schema to the Page
Where you add the schema depends on your website platform. For example, on a custom-built website, you can usually add JSON-LD directly into the head or body of the page.
On WordPress, you might add it through:
- A custom code field
- A theme file
- A custom HTML block
- A schema plugin
- A custom fields setup
- Google Tag Manager
On Shopify, schema is usually added through theme files such as product or collection templates.
On Wix, structured data can often be added through the page SEO settings.
If you are editing theme files directly, always take a backup first. A small mistake in a theme file can cause wider issues across the site, but with a recent backup, you can revert the changes to ensure your site is working again.

How To Add Schema Using a Plugin
If you need ‘basic schema’ such as Article schema for blog posts, Product schema for products, or Breadcrumb schema across the site, a plugin is typically the most straightforward way to add schema to your website.
The process is usually:
- Install a trusted schema or SEO plugin
- Choose the schema type for the page
- Fill in the required fields
- Check whether the plugin has added any schema automatically
- Test the page after publishing
The important thing is to review what the plugin outputs. Some plugins add default schema across the whole site, which may not always match the purpose of each page. For example, a plugin might add Article schema to blog posts automatically. This is usually fine. But if you’re also adding custom Article schema manually, you could end up with duplicate schema describing the same content.
Adding Schema Through Google Tag Manager
Schema can be added through Google Tag Manager using a Custom HTML tag. This can be useful when you don’t have direct access to the website code, or when you need to add schema to a small number of pages without developer support.
A simple process would be:
- Create a Custom HTML tag in Google Tag Manager
- Paste your JSON-LD schema into the tag
- Add a trigger so the tag fires on the correct page
- Preview the tag to check it fires correctly
- Publish the container
- Test the page using schema testing tools
This method can work, but it’s not always the best long-term approach for large websites. If schema needs to scale across products, articles or locations, a CMS template or data-led approach is usually cleaner.
When To Use Dynamic Schema
Using dynamic schema is a good idea when you have multiple pages that follow the same structure. Rather than manually creating schema for every page, the schema is generated from fields already stored in your website.
Ecommerce Product Pages
If you sell products online, dynamic Product schema can pull in information such as:
- Product name
- Image
- Description
- Price
- Currency
- Availability
- Brand
- SKU
This is much easier than writing schema manually for every product.
Location Pages
If your website has multiple location pages, dynamic LocalBusiness schema can pull in details such as:
- Business name
- Location name
- Address
- Phone number
- Opening hours
- Service area
This is useful for local SEO, but it needs to be handled carefully. Find more information on this in our blog, “Should You Add LocalBusiness Schema on Every Page?”.
Blog Posts and Articles
For blogs, dynamic Article schema can pull in:
- Headline
- Author
- Date published
- Date modified
- Featured image
- Publisher
- Page URL
This is usually managed through the blog template or SEO plugin.
Dynamic schema is not about adding more schema for the sake of it; it’s about making sure the right schema is added consistently across similar pages.

Examples of Schema in Use
Below we have provided a few short and simplified examples of schema markup. If you were to use these, you would need to adjust them to match the content and requirements of your own website.
Product Schema Example
Product schema is commonly used on ecommerce product pages. It helps search engines understand key product details such as the product name, price, and stock status. It should be used on product pages where the product information is clearly visible to users.
Product schema looks like this:
<script type=”application/ld+json”>
{
“@context”: “https://schema.org”,
“@type”: “Product”,
“name”: “Example Running Shoes”,
“image”: “https://example.com/product-image.jpg”,
“description”: “Lightweight running shoes for everyday training.”,
“brand”: {
“@type”: “Brand”,
“name”: “Example Brand”
},
“offers”: {
“@type”: “Offer”,
“priceCurrency”: “GBP”,
“price”: “79.99”,
“availability”: “https://schema.org/InStock”
}
}
</script>
LocalBusiness Schema Example
LocalBusiness schema is useful for businesses with a physical location or a clearly defined service area. This type of schema should match your actual business details. You shouldn’t use LocalBusiness schema to target areas where your business does not genuinely operate.
For example:
<script type=”application/ld+json”>
{
“@context”: “https://schema.org”,
“@type”: “LocalBusiness”,
“name”: “Example Business”,
“url”: “https://example.com”,
“telephone”: “0114 000 0000”,
“address”: {
“@type”: “PostalAddress”,
“streetAddress”: “1 Example Street”,
“addressLocality”: “Sheffield”,
“postalCode”: “S1 1AA”,
“addressCountry”: “GB”
}
}
</script>
Article Schema Example
Article schema is commonly used on blog posts, guides, and news-style content. If your blog template already adds Article schema automatically, check whether you need to add anything manually. You may only need to improve or correct the existing markup.
The markup should look like this:
<script type=”application/ld+json”>
{
“@context”: “https://schema.org”,
“@type”: “Article”,
“headline”: “How To Add Schema To Your Website”,
“datePublished”: “2026-06-29”,
“author”: {
“@type”: “Person”,
“name”: “Wildcat Digital”
},
“publisher”: {
“@type”: “Organisation”,
“name”: “Wildcat Digital”
}
}
</script>
What About FAQ Schema?
FAQ schema can still be useful when the page contains genuine FAQs, but it should not be added to every page by default.
Google has reduced the visibility of FAQ rich results over time, so FAQ schema shouldn’t be treated as a quick way to get more visibility in the search results. However, for more detail, read our blog, “Are FAQs and FAQ Schema Still Worth Using for SEO?”.
How to Test Schema Markup
Once your schema has been added, it needs to be tested. Even though you have successfully added it to the page, this doesn’t mean that it’s working correctly. Testing it can help you flag the issues and fix them. Once you’ve fixed any issues and your tests confirm that the markup is valid, this means that it is firing in the right places and working. However, it’s important to note that this does not guarantee that it will show in Rich Results.
Rich Results Test
Google’s Rich Results Test shows whether a page is eligible for supported rich results. It’s useful for schema types that Google uses for enhanced search features, such as products, recipes, reviews, events, and FAQs.
However, not every schema type will appear in this tool. If a schema type is valid but not linked to a Google rich result, it may not show in the Rich Results Test.
Schema Markup Validator
The Schema Markup Validator checks schema.org structured data more broadly. This is useful for checking whether your JSON-LD has syntax errors or missing elements. If your markup is flagging errors or missing elements, you need to fix these for the schema to work correctly.
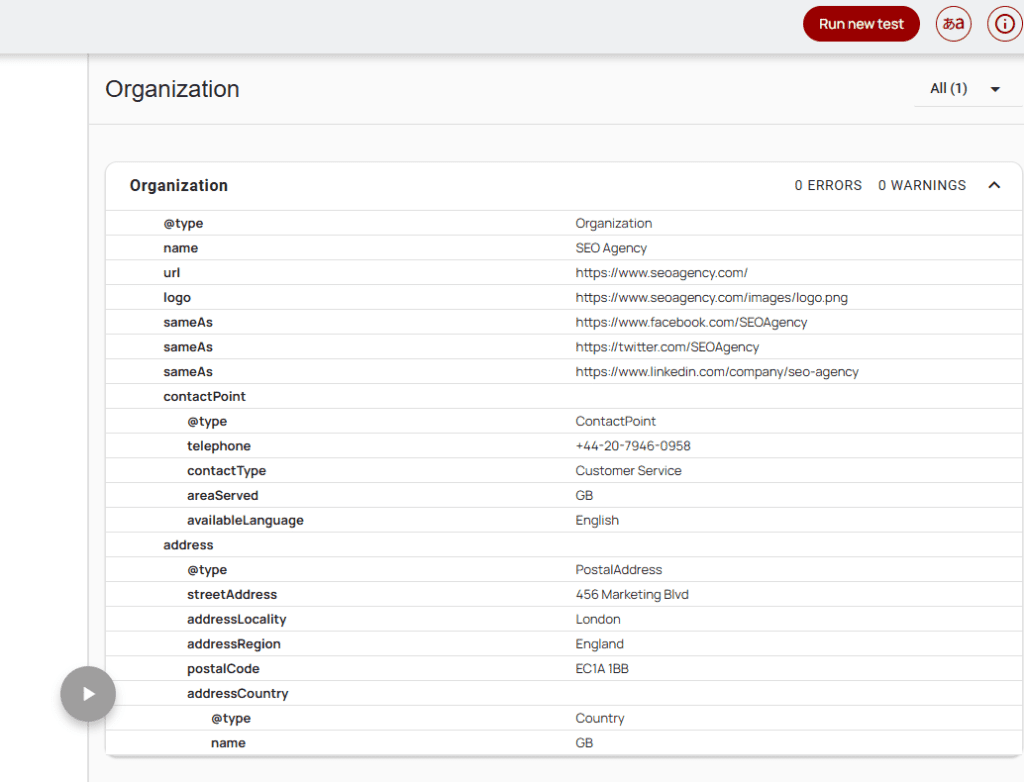
You should use this tool alongside the Rich Results Test, not instead of it.
Google Search Console Enhancements
After Google has crawled the page, Search Console may show structured data reports under Enhancements. These reports can help you monitor errors, warnings, and valid items across the site. They’re especially useful after template changes, plugin updates, or a large schema rollout, to spot issues early on.
For a more detailed process on testing schema, read our blog, “How to Test and Monitor Structured Data”.
Common Schema Mistakes to Avoid
Schema is useful, but only when it’s accurate. Poor schema can create confusion and may make your markup ineligible for rich results.
Here are some of the most common mistakes to avoid.
Marking Up Hidden Content
Don’t add schema for content that users can’t see on the page. If you mark up FAQs, reviews, prices, opening hours, or product information, that information should also be visible to users.
In short, everything you markup with schema needs to be visible to users first.
Adding Duplicate Schema
Duplicate schema can occur when a plugin adds schema automatically, and then custom schema is added on top.
For example, a blog post might have Article schema from an SEO plugin and another Article schema added manually. This can make the structured data messy and harder to manage.
Using the Wrong Schema Type
The schema should match the page’s main purpose. For example, a service page shouldn’t be marked up as a product unless it genuinely sells a product. Similarly, a location page shouldn’t use LocalBusiness schema if the business has no real connection to that location.
An easy way to ensure the schema type matches the page is by understanding exactly what your page is about and what it displays to users.
Adding Site-Wide Schema That Should Be Page-Specific
Some schema can be added site-wide, such as certain organisation details, but many schema types should only be added to relevant pages. For example:
- Product schema belongs on product pages
- Article schema belongs on articles
- FAQ schema belongs on pages with visible FAQs
Forgetting to Update Dynamic Schema
Dynamic schema is useful, but it needs to be monitored and updated accordingly. For example, if product prices, stock status, opening hours, or author details change, the schema should be updated too. If your schema pulls from outdated or incorrect fields, it will be inaccurate, and search engines may begin to ignore it.
Treating Schema as a Ranking Shortcut
Schema can support SEO, but it’s not a shortcut around poor content, weak technical SEO, or bad site structure. It works best when it’s part of a wider SEO setup that includes helpful content, clear internal linking, strong technical foundations, and a sensible site structure.
Don’t expect instant results and better rankings once you’ve implemented schema markup if your site and content are still poor, as schema only helps search engines understand content, not fix it.

Should You Add Schema to Every Page?
Not every page needs schema markup. However, some pages contain information that would benefit from being clearly marked up. Every schema type should have a clear reason for being there. If you can’t explain why a schema type belongs on a page, it probably shouldn’t be added. In short, only add schema where it accurately describes the purpose of the page.
Add Schema to Your Website With Help From Wildcat Digital
Knowing how to add schema to your website is useful, but getting it right across a full site can be more complex. The right setup depends on your CMS, page templates, content structure, business information, and wider SEO goals.
At Wildcat Digital, our technical SEO team can help create, implement, and test structured data that properly reflects your website’s content. Whether you need schema for products, services, locations, articles, or entity SEO, we can help build a clean setup that works alongside your wider SEO strategy.
Get in touch with our friendly team to learn more about our technical SEO services.